Activity 6.22 - 6.25 Geocoding
Contents
Activity 6.22 - 6.25 Geocoding#
In this notebook, you will learn how to geocode different sorts of location data by making requests to several online APIs (Application Programming Interface) for latitude and longitude co-ordinates associated with those locations.
The aim of the notebook is not to teach you formal approaches for working with APIs or the data that is returned from them. Instead, it’s something to whet your curiosity. Something to show you how, with a few lines of Python code, you can start to work with live, third-party datasources and online services to perform real-world programming tasks.
If something doesn’t work: DON’T PANIC. You won’t break your computer and you won’t break the internet. And you won’t fail the module if you just move on!
The location data we will consider includes:
Activity 6.22 - Geocoding an address using an API#
When Google Maps first appeared in 2005, it existed primarily as a browser based application. Developers soon started to identify the remote Google services that the application relied on and an official API soon followed, along with APIs for other geo-related services such as geocoding.
Since then, a wide range of other providers have opened up publicly accessible geo-related services, including openly licensed mapping services such as OpenStreetmap, as well as geocoding and geolcation services.
Many of these services are accessed programmatically using an API. Some of them, such as the Google APIs, require personal API keys which are associated with registered users and can be used to track, and bill for, usage. Other services, such as Open Street Map, and its associated Nominatim service, still publish open endpoints that do not require an API key.
Do not worry in this activity about the detail of how the call to the API is constructed using Python code or how the response is constructed. The main aim of this activity is simply to demonstrate that small amounts of code can be used to generate requests to third party online services, parse the response, and do something simple with it. However, if you do peek into the entrails of the data object that is returned, you may be able to identify recognisable things within it.
#The requests library makes it easy to call URLs using Python
import requests
Specify the address for which we want to find the geocoded location (you could use your own address here):
address='Open University, Walton Hall, Milton Keynes, MK7 6AA, UK'
Now we can construct a URL to call on the Nomimatim web service using this address as an argument.
Note that we are also requesting that the service provides a response using JSON (Javascript Object Notation) formatted data.
#Construct a request to the Nominatim geolocatio service using our desired address
r= requests.get("https://nominatim.openstreetmap.org/search", params={'q': address, 'format':'json'})
r.json()
Try rerunning the previous cell with an address that is familiar to you. Does the API find it?
Optional Activities#
try to display the location of an address you have geolocated on a map using
folium_magic. Remember, you can pass in the co-ordinates literally; for example:%folium_map -m 48.8584,2.2945 -z 17
%load_ext folium_magic
#Go for it... :-)
Activity 6.23 - Geocoding addresses and postcodes#
Postcodes are a widely used form of location data, typically capable of identifying a location to a resolution of a few hundred square metres.
There are several online services that will return geolocation information given a postcode. You have alreay seen how the Google geolocation API can geocode an address, and in many cases it can also geocode a postcode if it can identify it as such; providing a postcode + country name as the address can make this more reliable.
As you are perhaps starting to see from these notebook activities, data is often returned from webservices using the JSON (Javascript Object Notation) data format, although some APIs allow you to specify other formats such as XML.
(One advantage of the JSON response is that it can be immediately consumed by a Javascript script called from inside a webpage.)
JSON and XML both allow data to be represented in a structured, tree based hierarchical format. In this notebook, as well exploring a new API published via the postcodes.io website, we’ll start to look in a little bit more detail at how the JSON response is structured.
Looking at the data object returned from the postcodes.io API#
The postcodes.io API returns data as hierarchical, tree based JSON object. The tree has the following form:
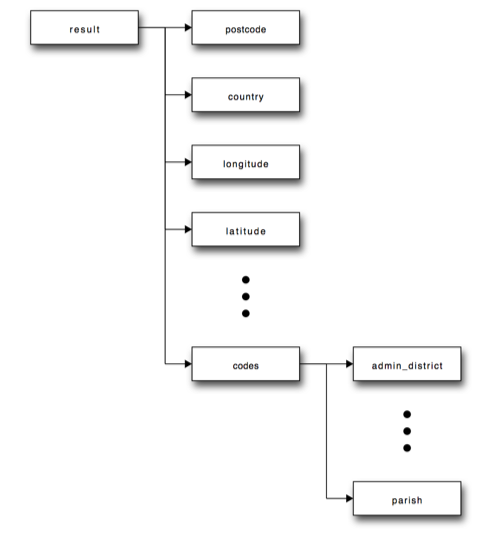
The result node is at the top of the tree with children postcode, latitude, longitude and so on. The codes child has further children, such as: admin and parish.
In python, data structures of this form can be represented using the dict (“dictionary”) structure, which you will meet elsewhere in the course.
The python requests library has a method that parses a correctly formed JSON response as a python dict, or more generally, as a set of nested dicts. In this case, one dict structure may be nested inside another to support child, grandchild, great grandchild, and so on, levels of structure.
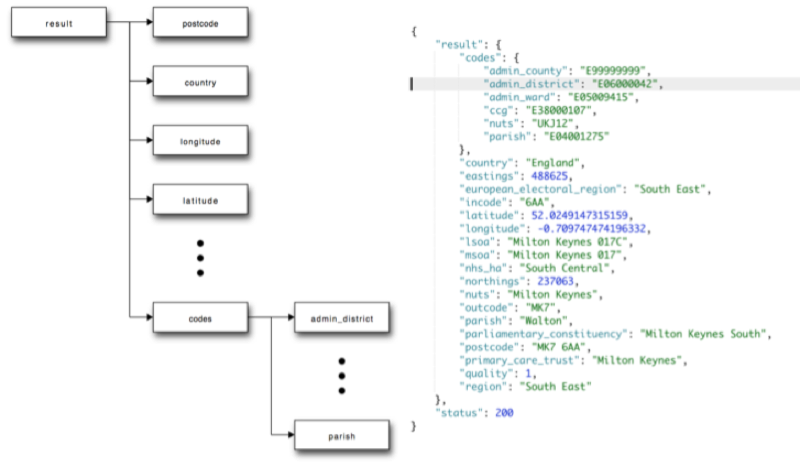
The contents of different levels of the nested dict data structure can be accessed by using a form of associative, relative addressing. For example, if the variable mypostcode is set to the dict shown above, we could access the contents of the main result part of the data structure by writing: mypostcode["result"].
To obtain the value of items in deeper nested parts of the data structure, we simply add further levels of relative addressing. To fetch the value of the postcode, we need to specify the path to it via the result node: mypostcode["result"]["postcode"]. To obtain the value of the parish in the code part of the data structure, we specify the path to it as mypostcode["result"]["code"]["parish"].
Run the following cells to call the postcodes.io API with a particular postcode.
See if you can make sense of the result that is returned.
#The requests library makes it easy to call URLs using Python
import requests
postcode = 'MK7 6AA'
r=requests.get('https://api.postcodes.io/postcodes/{PC}'.format(PC=postcode))
r.json()
Try rerunning the previous cell using different postcodes - can the service locate your home postcode?
Parsing the postcodes.io JSON data#
Once we have retrieved the data from the API, and cast it as a python data object, we can look inside it programmatically.
We can also create variables that contain subsets of the response data.
json = r.json()
json
results = json['result']
results
Let’s extract the latitude and longitude values. We can reach them in a variety of ways.
#Obtain the lat/long of a postcode
lat=r.json()['result']['latitude']

lon = results['longitude']

#Display the result
print(lat,lon)
Optional Activities#
use
folium magicto map the location of an address you have provided;see if you can create a variable that contains the formatted address of a location object retrieved from the postcods.io API;
see if you can write a loop that will look up the geolocations of several postcodes, one at a time, appending each response object to a list of responses. To be nice to the API import the python
timelibrary and add the statementtime.sleep(1)inside the loop to pause its execution for one second during each iteration.use some
folium_magicto display one or markers for each of your (looped) postcodes. You can use the-Mswitch to add multiple markers from a Python variable; pass in the name of a variable that refers to without the $ prefix. For example, if the markers are assigned to the variablemarkersuse the magic%folium_map -M markers:a single
dict, such asmarkers={'lat':52.0250, 'lng':-0.7084,'popup':'Open University, Walton Hall'}a single ordered
list, such asmarkers=[52.0250, -0.7084,'Open University, Walton Hall']a
listofdicts, such asmarkers=[{'lat':52.0250, 'lng':-0.7084,'popup':'Open University, Walton Hall'},{'lat':52.0, 'lng':-0.70,'popup':'Open University, Walton Hall'}]a
listof orderedlists, such asmarkers=[[52.0250, -0.7084,'Open University, Walton Hall'], [52., -0.7,'Open University, Walton Hall']]
Activity 6.24 - Geocoding an IP address#
As well as looking up geolocation data for a postal address, we can also try to look up a location based on the IP address of a computer. There are seveal websites that allow you to lookup the IP address of the device you are using to connect to the internet, and several webservices too.
One such service is the Amazon Web Servies (AWS) CheckIP service: http://checkip.amazonaws.com/ .
We could look up the IP address of the computer the notebooks are running on, but that would return the IP address of the server the notebooks are running on:
The AWS checkip service returns an IP address terminated by an end of line (\n) character. By using the requests library, we can call the URL, access the data response (text) and then strip (.strip())) the end-of-line whitespace character from it. But if we’re running the notebook on a cloud host, the IP address returned may not be very useful…
#The requests library makes it easy to call URLs using Python
import requests
notebookIPaddress=requests.get('http://checkip.amazonaws.com/').text.strip()
notebookIPaddress
Instead, vist the URL http://checkip.amazonaws.com in your brower and make a copy of the IP address it returns. Assign that address to the myIPaddress variable below:
myIPaddress = 'your.ip.address.here'
As before, we need to construct a URL to call a appropriate IP geolocation service. The service I’m going to use is ipstack.com.
#We can construct a URL based around the IP address of the machine making the request as follows:
KEY='d19510a436ddca4cb01822325ca40178'
url='http://api.ipstack.com/{IP}?access_key={KEY}'.format(IP=myIPaddress,
                                                          KEY=KEY)
url
As with the other APIs we have used, the response is provided as a JSON object. You may be getting a feel now for how we might be able to make the request and handle this response.
r=requests.get(url)
r.json()
If you are using a commercial ISP when you look up your IP address via your browser location bar using https://freegeoip.net or http://checkip.amazonaws.com/ - for example, if you are using home broadband through a large ISP - you may find that the location identified is nowhere near you. In this case, the locatin may refer to the physical network datacentre that is managing your network connection.
If you tried to geocode the IP address in notebookIPaddress, the result may surprise you. If the notebook and the python process associated with it is running on a server hosted in the cloud. In some cases, the response may often be empty as the location of the IP address is unknown - the physical location of the IP address may be hard to pin down if the servers they are assigned to are floating in the cloud!
Activity 6.25 - Reverse geocoding a postcode#
Reverse geocoding refers to the ability to go from a geocoded location, represented as a latitude/longitude pair, for example, back to an address or location.
The postcodes.io service supports reverse geocoding by accpeting a latitude/longitude pair and returning the postcode area associated with it, along with a data about other admonistrative gepgraphy regions that the location falls within.
#Use the OU Walton Hall Location
lat, lon = (52.0250, -0.7084)
r=requests.get('https://api.postcodes.io/postcodes?lon={lon}&lat={lat}'.format(lon=lon,lat=lat))
r.json()
One thing to note from this response is that it actually returns two locations. We can write a simple bit of Python code to iterate through the results list and pull out the postcodes.
#Test - can we retrieve the postcode from the first item (list index 0) in the results list?
r.json()['result'][0]['postcode']
#Iterate through all the results
for result in r.json()['result']:
    print(result['postcode'])
Finally, let’s create a function to display the postcode(s) associated with a supplied latitude, longitude pair.
def get_postcode_from_latlon(lat, lon):
    ''' Use the postodes.io API to retrieve postcodes for a location'''

    r=requests.get('https://api.postcodes.io/postcodes?lon={lon}&lat={lat}'.format(lon=lon,lat=lat))

    #Parse the JSON response
    json = r.json()

    #Extract the results list
    results = json['result']

    #Create an empty list to hold the postcodes
    postcodes = []

    #Iterate through the results
    for result in results:
        #Extract the postcode
        postcodes.append(result['postcode'])

    return postcodes
get_postcode_from_latlon(lat, lon)
Summary#
In this notebook, you have learned how to geocode several different sorts of location identifer - postcodes, postal addresses and IP addresses.
You have also seen how we can take the JSON data returned from the geolocation services and parse it as python dict that we can then start to work as data, for example, by plotting markers associated with identified locations on an interactive map.